New MVC Project
首先,先下載ASP.NET MVC3來安裝,MVC3需要.NET Framework 4 與 Visual Studio 2010(或是Visual Web Developer 2010),系統需求則是Windows 7,Windows Server 2003,Windows Server 2008,Windows Server 2008 R2,Windows Vista....不過我在XP SP3上也是能跑啦。
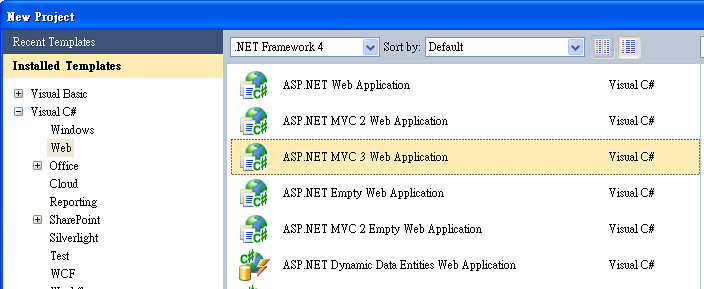
安裝完成後,會需要重新開機,然後就開VS2010,選擇ASP.NET MVC 3 Web Application。
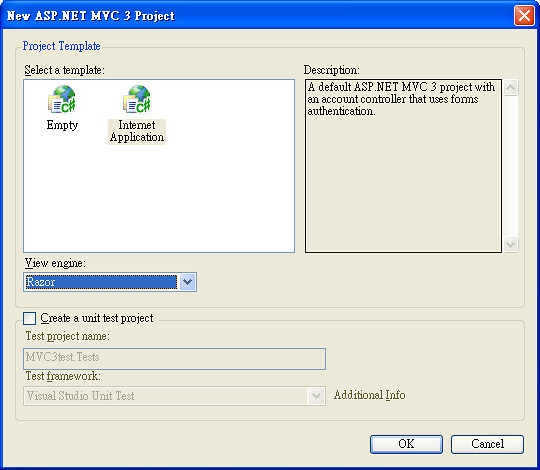
然後選擇 Internet Application,這樣專案才有基本的東西能看,Engine選Razor(這是MVC3新的)。
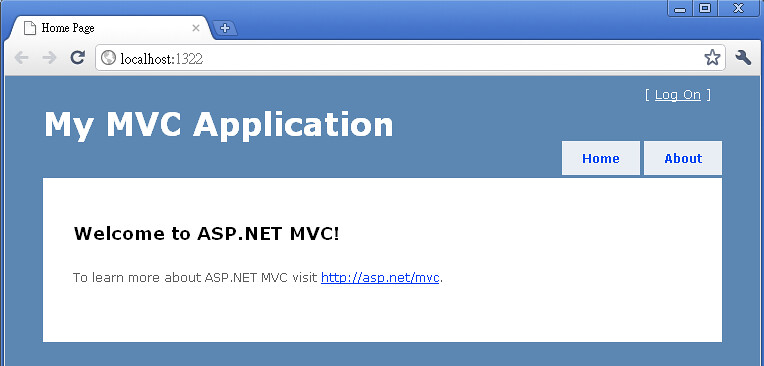
專案開啟後,直接執行,跑出來的結果會長的這個樣子,這是系統幫你建的基本樣式。
現在回頭看Visual Studio 2010,沒意外系統會開著HomeController.cs,內容差不多是這樣。
namespace MVC3Test.Controllers
{
    public class HomeController : Controller
    {
        public ActionResult Index()
        {
            ViewBag.Message = "Welcome to ASP.NET MVC!";

            return View();
        }

        public ActionResult About()
        {
            return View();
        }
    }
}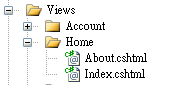
可以看到在 HomeController.cs裡的兩個Function Index() , About(),分別控制著 View/Home/ 下面的 Index.cshtml, About.cshtml
與MVC2不同的是,在MVC2中的 ViewData["Message"]
ViewData["Message"] = "Welcome to ASP.NET MVC!";
變成了MVC3中的ViewBag.Message
ViewBag.Message = "Welcome to ASP.NET MVC!";
不過基本上兩者是差不多的,一樣是什麼都吃的,後面範例會看到用法。
Controller
稍微看過MVC長怎樣後,接下來自己建新的Controller 跟View。
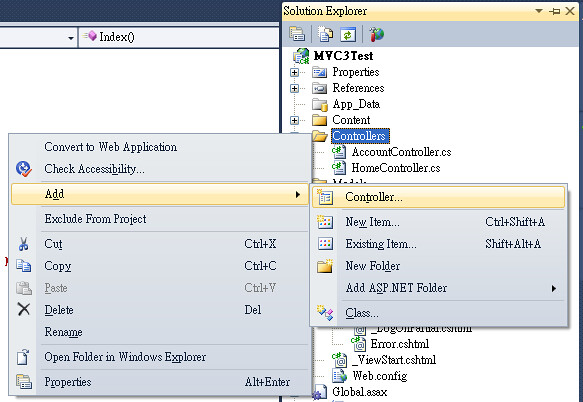
在專案中的Controllers資料夾裡新增一個Controller,我命名為YooooController,然後在裡面加上一個 function
public string test()
{
return "yoooooooo~~";
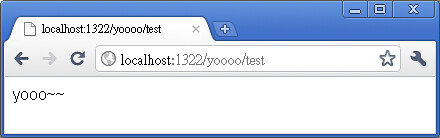
}接下來執行專案,連到Yoooo/test,你就會看到下面的結果。

這是MVC只使用Controller顯示結果的方式,接下來加入接收QueryString的功能。
Basic Input/Output
接著將剛剛的 function 改成這樣
public string test(int times=3)
        {
            StringBuilder MyStringBuilder = new StringBuilder("y~~");
            for (int i = 0; i < times; i++)
            {
                MyStringBuilder.Insert(1, 'o');
            }
                return MyStringBuilder.ToString(); ;
        }
在這邊會接收一個叫做 times 的參數,型態為整數,並設定預設值為3,若輸入錯誤(非整數)或是沒輸入時就會使用預設值。然後會按照times的次數去產生字串。
預設值時會只組出3個 "o"
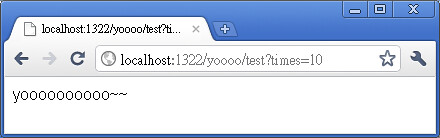
times設為10的時候就有10個 "o"
Route
如果不想要在網址列上出現QueryString的話,可以打開Global.asax.cs,找到下面這段
public static void RegisterRoutes(RouteCollection routes)
        {
            routes.IgnoreRoute("{resource}.axd/{*pathInfo}");

            routes.MapRoute(
                "Default", // Route name
                "{controller}/{action}/{id}", // URL with parameters
                new { controller = "Home", action = "Index", id = UrlParameter.Optional } // Parameter defaults
            );
        }
這是MVC在設定網站路徑的地方,目前的設定就是預設首頁為Home Controller下的Index這個Action,如果有要新增Route記得要加在預設路徑前,不然會被預設蓋過的。下面我們加一個route,叫做test , 內容如下
routes.MapRoute(
                "Test", // Route 名稱
                "Yoooo/test/{times}", // URL 與參數名稱
                new { controller = "Yoooo", action = "test" }// 參數預設值
            );
因為預設值在function中設了,所以這邊就沒設。
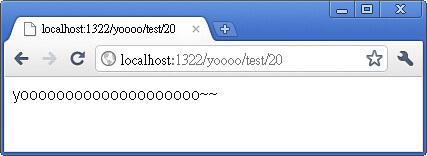
然後連到 http://localhost:1322/yoooo/test/20 的時候,出來的結果就跟 http://localhost:1322/yoooo/test?times=20是一樣的。
View
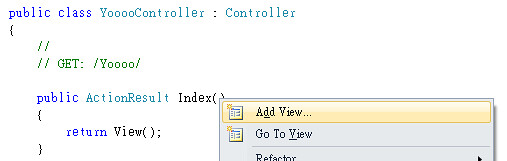
接下來我們在YooooController下新增一個View,在function Index上右鍵選Add View。
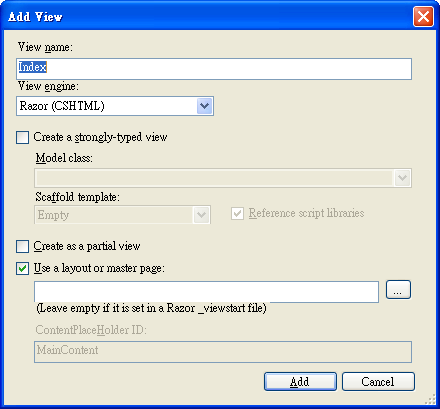
Add View 的視窗都選擇預設,按下Add,系統就會幫你在View/Yoooo/下面生出Index.cshtml這個檔案。
在新建的View裡加入一行顯示ViewBag.Text。
@{
    ViewBag.Title = "Index";
}

<h2>Index</h2>

<b> @ViewBag.Text </b>
我是用MVC3的寫法,MVC2的話則要用ViewData去寫。
然後稍微修改一下Controller,拿剛剛的function test()過來用,把結果顯示到新建的View裡。
public class YooooController : Controller
    {
        //
        // GET: /Yoooo/

        public ActionResult Index(int times = 3)
        {
            ViewBag.Text = test(times);
            return View();
        }

        public string test(int times)
        {
            StringBuilder MyStringBuilder = new StringBuilder("y~~");
            for (int i = 0; i < times; i++)
            {
                MyStringBuilder.Insert(1, 'o');
            }
                return MyStringBuilder.ToString(); ;
        }

    }
結果出來之後就會是這樣
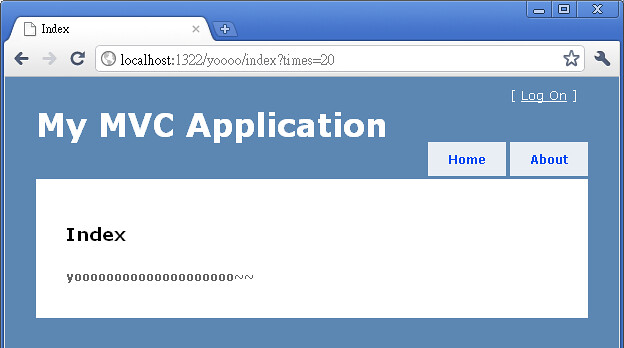
將原本單純的文字結果套到MVC預設的範本頁面裡。
本篇將MVC基本的Controller, View, Route, Input/Output做了介紹,之後的文章會繼續介紹比較深入一點的東西,敬請期待。

No comments:
Post a Comment