
SSD - Single Shot MultiBox Detector is an object detection model that has comparable accuracy with region proposals model(e.g. Faster RCNN) and is much faster. This time I will test SSD with Pyhton OpenCV DNN and check the result.
SSD - 單發多框偵測器(亂翻)是個在準確率上與候選區域模型(如Faster RCNN)不相上下,但速度更快的物體偵測模型。這次我將在Python OpenCV DNN環境下測試SSD看看其結果。
First, download SSD model from here, if you want to do train/evaluate just follow the instruction at same page, we only use model for detecting objects now.
首先,從這邊下載SSD模型,如果你想做訓練/驗證只要照著同一頁的說明去做就好,我們現在只用模型去做物件偵測。
Let's watch the code, at first we need to create label list, SSD can detect 20+1 (the extra one is called background) kinds objects, then we random create a color list mapping to label to keep same label with same color.
來看程式,我們先建立標籤列表,SSD可以偵測20+1(多的一個叫背景)種物體,然後我們用亂數建立一個對應標籤的顏色列表來讓同一種標籤保持同個顏色。
#make label and color list
labels = ["background", "aeroplane", "bicycle", "bird", "boat",
          "bottle", "bus", "car", "cat", "chair",
          "cow", "diningtable", "dog", "horse", "motorbike",
          "person", "pottedplant", "sheep",  "sofa", "train", "tvmonitor"]
colors = np.random.uniform(0, 255, size=(len(labels), 3))
Prepare test image, get height/width for later use, and resize to model required size when create blob.
準備測試圖片,取得高度/寬度供之後使用,並在創建blob時調整圖片至模型所需大小。
#prepare test image
image = cv2.imread('fish-bike.jpg')
(h, w) = image.shape[:2]
blob = dnn.blobFromImage(image, 1, (300, 300))
Load model and feed in blob, get result.
載入模型並餵入blob,取得結果
#prepare model network
prototxt = "models\VGGNet\VOC0712Plus\SSD_300x300_ft\deploy.prototxt"
model = "models\VGGNet\VOC0712Plus\SSD_300x300_ft\VGG_VOC0712Plus_SSD_300x300_ft_iter_160000.caffemodel"
net = dnn.readNetFromCaffe(prototxt, model)

#feed in image and get result
net.setInput(blob)
prob = net.forward()
Draw label and box to image to show result.
在圖片上畫上標籤與框框來顯示結果。
#diaplay result
for i in np.arange(0, prob.shape[2]):
confidence = prob[0, 0, i, 2]
if confidence > 0.4: #change threshold value to get the result you want
# get data from prob
index = int(prob[0, 0, i, 1])
box = prob[0, 0, i, 3:7] * np.array([w, h, w, h])
(x, y, endX, endY) = box.astype("int")
color = colors[index]
# draw rect
cv2.rectangle(image, (x, y), (endX, endY), color, 2)
# draw label
label = "{}: {:.2f}%".format(labels[index], confidence * 100)
print("{}".format(label))
(fontX, fontY) = cv2.getTextSize(label, cv2.FONT_HERSHEY_TRIPLEX, 0.5, 1)[0]
y = y + fontY if y-fontY<0 else y
cv2.rectangle(image,(x, y-fontY),(x+fontX, y),color,cv2.FILLED)
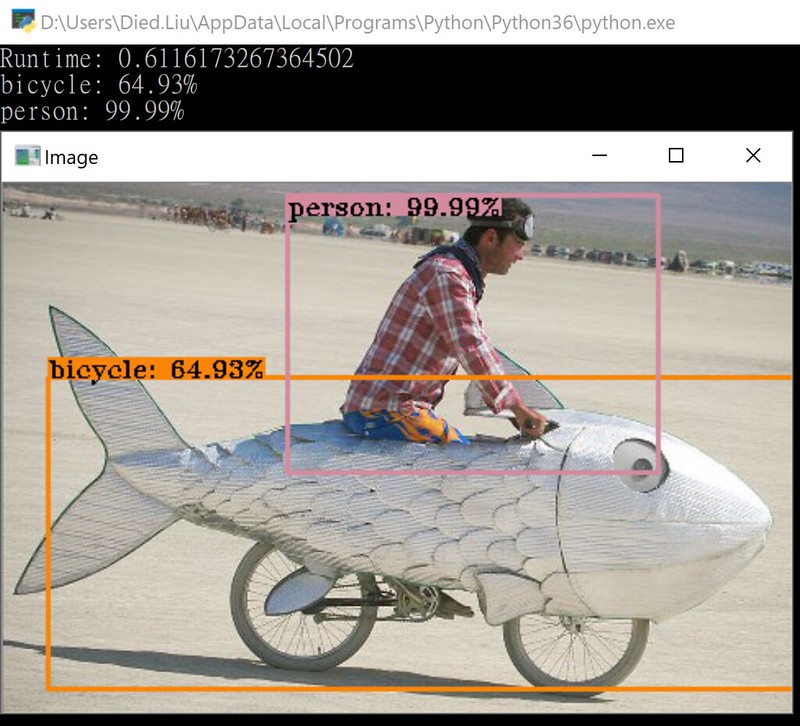
cv2.putText(image, label, (x, y), cv2.FONT_HERSHEY_TRIPLEX, 0.5, (0,0,0), 1)The detect result image was here.
偵測結果圖片如下。
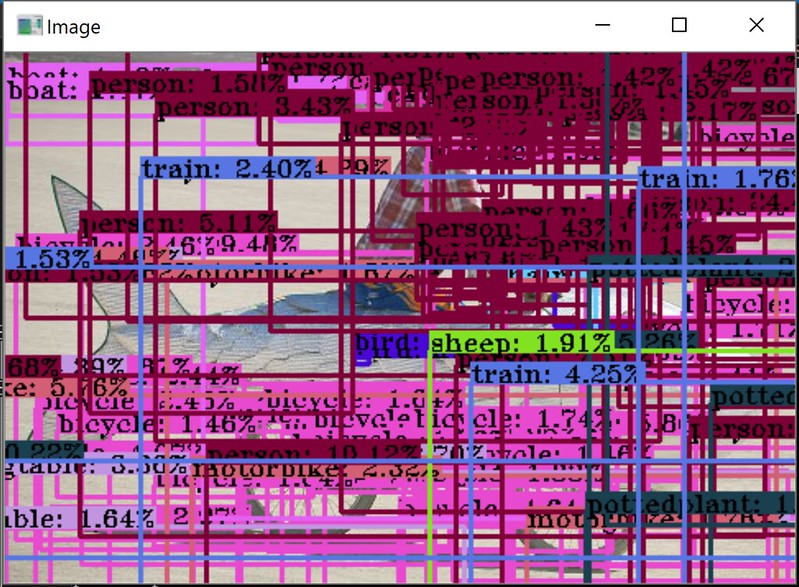
If we change confidence threshold value to zero, can see all object that SSD detected, you can adjust it to fit your requirement.
如果我們將信心度閾值更改為零,則可以看到SDD檢測到的所有物體,你可以對應需求而去調整它。
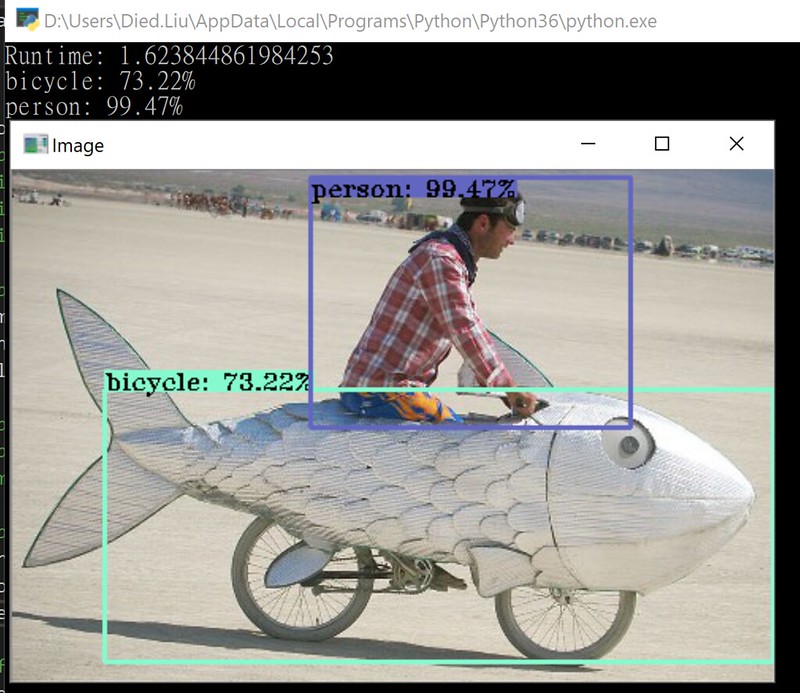
Change to SSD 512x512 model can get better accuracy(overall), but it take more runtime.
更改為SSD 512x512模型可以獲得更好的精確度(整體來說),但執行時間會更長。
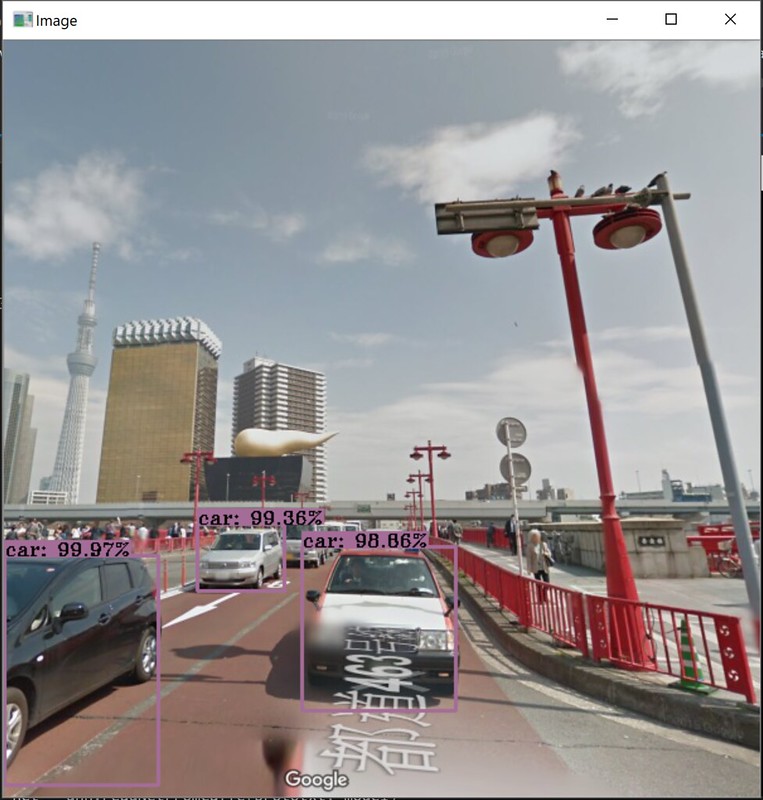
Another test, source is Google Map Street View.
另外一個測試,圖片來源是Google地圖街景。
Here is full code.
完整程式碼在這。
import time
import numpy as np
import cv2
from cv2 import dnn

#make label and color list
labels = ["background", "aeroplane", "bicycle", "bird", "boat",
          "bottle", "bus", "car", "cat", "chair",
          "cow", "diningtable", "dog", "horse", "motorbike",
          "person", "pottedplant", "sheep",  "sofa", "train", "tvmonitor"]
colors = np.random.uniform(0, 255, size=(len(labels), 3))

#prepare test image
image = cv2.imread('fish-bike.jpg')
(h, w) = image.shape[:2]
blob = dnn.blobFromImage(image, 1, (512, 512))

#prepare model network
prototxt = "models\VGGNet\VOC0712Plus\SSD_512x512_ft\deploy.prototxt"
model = "models\VGGNet\VOC0712Plus\SSD_512x512_ft\VGG_VOC0712Plus_SSD_512x512_ft_iter_160000.caffemodel"
net = dnn.readNetFromCaffe(prototxt, model)

#feed in image and get result
net.setInput(blob)
t = time.time()
prob = net.forward()
print("Runtime:", time.time()-t)

#diaplay result
for i in np.arange(0, prob.shape[2]):
    confidence = prob[0, 0, i, 2]
    if confidence > 0.4:    #change threshold value to get the result you want
        # get data from prob
        index = int(prob[0, 0, i, 1])
        box = prob[0, 0, i, 3:7] * np.array([w, h, w, h])
        (x, y, endX, endY) = box.astype("int")
        color = colors[index]
        # draw rect
        cv2.rectangle(image, (x, y), (endX, endY), color, 2)
        # draw label
        label = "{}: {:.2f}%".format(labels[index], confidence * 100)
        print("{}".format(label))
        (fontX, fontY) = cv2.getTextSize(label, cv2.FONT_HERSHEY_TRIPLEX, 0.5, 1)[0]
        y = y + fontY if y-fontY<0 else y
        cv2.rectangle(image,(x, y-fontY),(x+fontX, y),color,cv2.FILLED)
        cv2.putText(image, label, (x, y), cv2.FONT_HERSHEY_TRIPLEX, 0.5, (0,0,0), 1)

cv2.imshow("Image", image)
cv2.waitKey(0)
Hope you enjoy it.
Finally, maybe you will wonder why SSD300 said it has 40+ FPS but on this test it cost 0.6sec for one image ? That's because Python+OpenCV(3.3.1) can't run with CUDA, but calculate via GPU is the only way to get high FPS, so here have 2 option can solve it:
最後,也許你會覺得奇怪為啥SSD300說他可以跑到40+ FPS但這個測試一張圖要花0.6秒 ? 這是因為Python+OpenCV(3.3.1)無法啟用CUDA,但要有高FPS的唯一方法就是靠GPU去算,所以有兩個方法可以解決這問題:
1. python + caffe
2. c++ + OpenCV

No comments:
Post a Comment